|
I recently decided to make a new CV in LaTeX, and quickly ran into a problem: I found most existing templates, such as those found here or here to be a little too complicated for my taste. So I decided to make my own.
I started by looking at some CVs online, and picked a favorite. To aid in my shameless copying of this very nice CV, I wrote a simple LaTeX template, which you can download here. The template is based on a few simple environments and commands. Environments: All of the following environments include a section header as an argument (see \cvsec, below). cvfree: An unformatted section of the CV. cvchrono: A tabular format used for chronological entries. cvlist: An enumerated list. The numbering will reset every time this command is used. cvcontinue: An enumerated list where the numbering continues from the last enumerated list. Commands: \cvsec{title}: A section of the CV. It automatically avoids a page break between the section header and the first entry. \cvitem{date}{entry}: An item for the cvchrono environment. To accommodate multiple rows for "entry" just include them with e.g. \cvitem{2016}{some entry \\ & continued \\ & continued further}, where the "\\ &" separators take advantage of the fact that there is a tabular environment operating under the hood. \cvpaper{title}{abstract}: A paper title with abstract below.
6 Comments
A simple little application popped up recently for some of Python's amazing regular expressions tools that I thought I would share.
Like many academics, I use BibTeX to manage citations in papers, which makes adding and citing references a breeze. Even better, many web sources, including Google Scholar, automatically generate the BibTeX code for you, which you can paste directly into your .bib file. For a s̶h̶a̶m̶e̶l̶e̶s̶s̶ ̶p̶l̶u̶g̶ relevant example, the automatically generated BibTeX code for "Rare Shocks, Great Recessions" is:
@article{curdia2014rare,
  title={Rare shocks, great recessions},
  author={C{\'u}rdia, Vasco and Negro, Marco and Greenwald, Daniel L},
  journal={Journal of Applied Econometrics},
  volume={29},
  number={7},
  pages={1031--1052},
  year={2014},
  publisher={Wiley Online Library}
}
Everything is perfect except for one tiny thing...the title isn't capitalized! I prefer "Rare Shocks, Great Recessions." Basically all automatically generated BibTeX entries don't capitalize, so if I wanted to change this for every title in my bibliography it would mean a ton of manual editing. Instead, I wrote a little Python script that takes care of this using regular expressions and the titlecase module. Enjoy!
"""This script replaces lowercase titles in BibTeX entries with titlecase
e.g., 'The greatest title of the all time' to 'The Greatest Title of All Time'."""

import re
from titlecase import titlecase

# Set path and name of bib files
directory = '/path/to/my/file/'
my_file = 'my_bibfile.bib'
new_file = 'new_bibfile.bib' # in case you don't want to overwrite

# Match title or journal segment allowing for whitespace (UPDATED 8/12/19)
pattern = re.compile(r'(\W*)(title|journal)\s*=\s*{(.*)},')

# Read in old file
with open(directory + my_file, 'r') as fid:
    lines = fid.readlines()

# Search for title strings and replace with titlecase
newlines = []
for line in lines:
    # Check if line contains title
    match_obj = pattern.match(line)
    if match_obj is not None:
        # Need to "escape" any special chars to avoid misinterpreting them in the regular expression.
        oldtitle = re.escape(match_obj.group(3))

        # Apply titlecase to get the correct title.
        newtitle = titlecase(match_obj.group(3))

        # Replace and add to list
        p_title = re.compile(oldtitle)
        newline = p_title.sub(newtitle, line)
        newlines.append(newline)
    else:
        # If not title, add as is.
        newlines.append(line)

# Print output to new file
with open (directory + new_file, 'w') as fid:
    fid.writelines(newlines)
I recently came across an interesting problem. I needed to set values for a bunch of variables, call them $x_1, \ldots, x_n$, and each one had a known rule of the form:
$$ x_i = f(x_{i_1}, ..., x_{i_{k}}) $$ so that each variable needed be initialized as a function of some set of other variables (possibly empty). This type of problem is familiar to many economists, (e.g., setting initial values in the popular macroeconomics software Dynare), but likely occurs in many other scientific computing applications as well. As anyone who has tackled this situation knows, the tricky part is ordering the rules so that each $x_i$ is initialized after all the variables it depends on. For small problems, this can be done manually without too much trouble. As the size of the problem grows, however, the complexity of this task can easily get out of hand. For example, in my application, the dependency structure turned out to be: 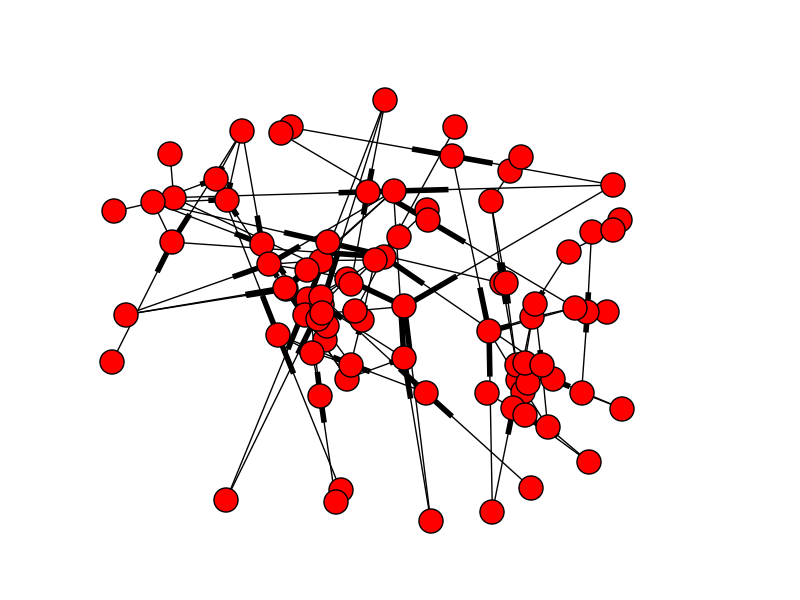
Yikes. Doing this manually would be a nightmare. Let's automate it! My approach was to create a directed graph, which is a collection of nodes combined with one-way arrows connecting those nodes. I constructed a graph with the $\{x_i\}$ as the nodes, and then added an arrow from each $x_i$ to every $x_j$ that depends on it. Once the graph is constructed, running a topological sort generates a list of the variables in order so that each node is listed after all of its dependencies -- exactly what we needed. To demonstrate, I'll show a simple example: a = 2.0 * c; b = a + c; c = 5.0; In this case, the solution is to initialize $c$ first, then $a$, then $b$. To implement the directed graph, I used the excellent Python package NetworkX. I started with a dict of (var, rule) pairs. For each rule, I extracted all the variable names using Python's regular expressions (re) module. I then constructed the graph and ran the sort. Here's the code:
import networkx as nx
import re

"""Construct regular expressions pattern to search for variable names.
This will find all blocks of letters, numbers, or underscores
starting with a letter or underscore."""

pattern = re.compile('[a-zA-Z_]\w*')

# Initialize the graph
G = nx.DiGraph()

# Example set of rules
rules = {
    'a' : '2.0 * c',
    'b' : 'a + c',
    'c' : '5.0',
}

# Loop through the rules
for var, rule in rules.items():

    # Add variable to graph
    G.add_node(var)

    # Get list of dependencies
    dependencies = re.findall(pattern, rule)

    # Add edges
    for dep in dependencies:
        G.add_edge(dep, var)

# Get sorted variable list
sorted_vars = nx.topological_sort(G)

# Get sorted list of rules
sorted_rules = [(var, rules[var]) for var in sorted_vars]

# Print results
for var, rule in sorted_rules:
    print('{0} = {1};\n'.format(var, rule))
The output is: c = 5.0; a = 2.0 * c; b = a + c; just like we wanted.
Eigen is a fantastic matrix and linear algebra library for C++, which I highly recommend.
Since it's important to be able to see inside a matrix while debugging, Eigen has provided Python "pretty printer" scripts for debuggers. The scripts for gdb (the debugger I use), are located in eigen/debug/gdb. Note: package managers may not include this directory. If you don't have it, you can download a new copy of Eigen here. You don't need to replace your existing installation, just put the eigen/debug/gdb directory somewhere and use that for the instructions below. If you follow the directions in the comments of printers.py (in this directory), you can set up gdb so that it will print the contents of the matrix rather than some obscure sequence of pointers and iterators when you are debugging. Great! Recently, however, I started seeing the pointers and iterators again instead of the content. I also started getting errors like: TypeError: 'map' object is not subscriptable This error is caused by the fact that the printers.py script is in Python 2, while my version of gdb is built in Python 3. To fix this issue, you can use the Python utility 2to3, which automatically converts Python 2 code to Python 3 code. To do this, go to the eigen/debug/gdb directory and run the shell command 2to3 -w printers.py You should be good to go! |
 RSS Feed